Create a mini web server using Monotouch to serve up a Silverlight app to your desktop

Creating a minimalist web server running inside your app on an iPhone offers some interesting scenarios for sharing data on your local network. You can use this to serve up html, but I thought it would be interesting to have it serve up a Silverlight app. Since Silverlight apps are packaged in zip files (with a different extension, .xap) they make for a clean deployment in an iphone app scenario. You can create the server in your app using Systems.Net.Sockets. For example you can create a class that uses TcpListener to accept incoming traffic and then use TcpClient to get the network stream for reading and writing. Once you have this you can parse the incoming requests in accordance to whatever protocol (or subset thereof) you want to support and then write your response back with whatever content you want served up to the caller. In this case, I’m looking for http traffic and based upon the uri in the request, serving up just the few things needed to get the silvelight app, stored in the iphone app, to the client browser.

The first thing you need to do is get an address for the TcpListener to listen on. Note this is a bit different between the simulator and the device as the later does not include the “.local” suffix when resolving the host name, so you’ll need to add it.

#if (SIM)
IPAddress localAddr = IPAddress.Parse ("127.0.0.1");
int port = 0;
#else
string hostName = System.Net.Dns.GetHostName () + ".local";
int port = 0;
IPHostEntry hostEntry = Dns.GetHostByName (hostName);
IPAddress localAddr = hostEntry.AddressList[0];
#endif

Once you have the address you can use it to create a TcpListener and as requests come in, parse them to serve up the necessary responses for Silverlight, which are the hosting html page, the Silverlight.js file and the .xap file itself. For a Silverlight app that makes no additional network calls internally, once it’s at the client browser, no additional server support will be needed. If you want additonal calls supported for images, other files or whatever else you can think of, you can implement them in the server in a similar fashion to that used in serving up the xap.

...

while (true) {

RaiseLogEntryEntered ("mtServer is alive and listening");

TcpClient tcpClient = tcpListener.AcceptTcpClient ();

using (NetworkStream netStream = tcpClient.GetStream ()) {

string request = ReadRequest (netStream);

string uri = ParseGetUri (request);

if(uri.EndsWith(".js"))
{
SendSilverlightJavascriptResponse(netStream);
}
else if(uri.EndsWith(".xap"))
{
SendSilverlightXAPResponse(netStream);
}
else //default everything else to the hosting html page (could get more granular here if we want)
{
SendSilverlightHostPageResponse(netStream);
}

tcpClient.Close ();
}

...

The SendXYZ methods are just wrappers on a single call to send a response to the client browser:

void SendResponse(NetworkStream netStream, string contentType, string resourcePath)
{
byte[] resource = File.ReadAllBytes(resourcePath);

string responseHeaders = String.Format ("HTTP/1.1 200 OK\r\nContent-Length: {0}\r\nContent-Type: {1}\r\n\r\n",
resource.Length, contentType);

byte[] responseHeadersEncoded = Encoding.UTF8.GetBytes (responseHeaders);

netStream.Write (responseHeadersEncoded, 0, responseHeadersEncoded.Length);

RaiseLogEntryEntered (String.Format ("Response:\r\n{0}", responseHeaders));

netStream.Write(resource, 0, resource.Length);
}

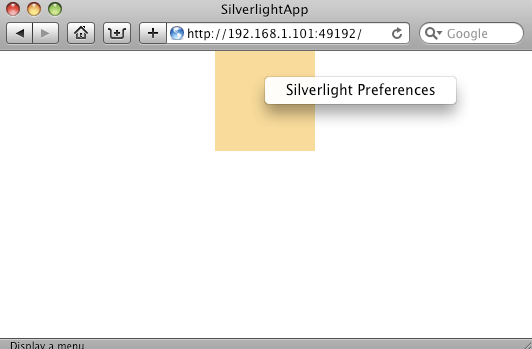
In the iPhone app I created a view with a UILabel to show the address that the app is listening on and a UITextView to display the raw traffic from the http server.

Here are screenshots of the iPhone app running on the device and the Silverlight app served up to Safari on my Mac:

Setting an image background on a UITableView using Monotouch

Here’s a simple technique to set a background image on a UITableView such that the background doesn’t scroll with the table view. Instead on loading the table view directly load it as a subview of a UIImageView. When creating the UIImageView, set its frame to the dimensions of the iPhone, 320X480. Then, after adding the UITableViewController’s view as a subview of the UIImageView, set the table view’s background to be transparent. When you load the image view, you’ll have your table view with the image as it’s background.

Here’s a simple example (table view controller code omitted for brevity):


using System;
using System.Collections.Generic;
using System.Linq;
using MonoTouch.Foundation;
using MonoTouch.UIKit;

namespace TableBackgroundDemo
{
  public class Application
  {
    static void Main (string[] args)
    {
      UIApplication.Main (args);
    }
  }

  // The name AppDelegate is referenced in the MainWindow.xib file.
  public partial class AppDelegate : UIApplicationDelegate
  {
    // This method is invoked when the application has loaded its UI and its ready to run
    public override bool FinishedLaunching (UIApplication app, NSDictionary options)
    {
      UIImageView imgView = new UIImageView(UIImage.FromFile("background.jpg"));
      imgView.Frame = new System.Drawing.RectangleF(0,0,320,480);
      imgView.UserInteractionEnabled = true;
      imgView.AddSubview(someTableViewController.View);
      someTableViewController.TableView.BackgroundColor = UIColor.Clear;

      window.AddSubview (imgView);

      window.MakeKeyAndVisible ();

      return true;
    }

    // This method is required in iPhoneOS 3.0
    public override void OnActivated (UIApplication application)
    {
    }
  }
}

And here’s the final result:

Display default image for splash screen using Monotouch and XCode

Update: The images group this post mentions is technically not necessary and is really just for organization as Xcode puts the physical file at the root. Within MonoDevelop however, including a folder called images will be persisted (which is why this didn’t work when I tried it from MonoDevelop). To make it work from MonoDevelop, simply include the Default.png in the root of your project and give it a Build Action of Content. Thanks to Michael Hutchinson for clarifying this.

Many iphone apps display a startup image when loading rather than an empty black screen. In Xcode this works by having a file named Default.png in an Images group. I couldn’t find a way to do this directly in MonoDevelop yet, but since MonoDevelop supports emitting an Xcode project, we can use this to take advantage of any features that Xcode offers, such as this.

First, in MonoDevelop select Debug in Xcode. This will create an Xcode project under the Debug directory.

Next, open the Xcode project and add a new group called Images.

After this simply add an image file named Default.png.

I tested this on the device and it worked well. If anyone knows a way to do this directly from MonoDevelop please let me know.

Using Monotouch with the .Net library for the Google Data API

Update: With the recent release of Monotouch 1.1 and the associated update to MonoDevelop, the Mono for iPhone runtime option is no longer directly available. Instead, you now create a “Monotouch Library Project” to have the runtime set to Mono for iPhone. For an existing library project, like the ones in this post, you can edit the project file in a text editor and add the appropriate ProjectTypeGuid element (create a new Monotouch Library Project and open it in a text editor to get the correct value to put in your csproj files).

One of the interesting things about Monotouch is that it allows you to incorporate an existing c# library in an iphone application. In this post I’ll show you how to adapt Google’s open source .Net client library to access the Google calendar service using Monotouch. I’m using version 1.4.0.2 of the Google Data API which you download from the following url:

http://google-gdata.googlecode.com/files/libgoogle-data-mono-1.4.0.2.tar.gz

First we’ll create a new Monotouch application named gCal using the iPhone Monotouch Project solution template in MonoDevelop. In MonoDevelop right-click (or ctrl-click) the gCal solution and select Add->Add Exisiting Project. Navigate to the location where you unzipped the libgoogle-data-mono-1.4.0.2 directory and then to the src subdirectory. The projects we’ll be using are Access Control, Calendar, Common Data Extensions and Core Client, the projects for which are located under src in gacl, gcalendar, extensions and core respectively. So to add Access Control, navigate to /src/gacl in the “Add to Solution” window and select Access Control.csproj. Repeat the process for the other 3 projects. You’ll need to change the build target for each project to be Mono for iPhone. Right-click on the Access Control project and select Options->Build->General. In the runtime version dropdown select Mono for iPhone:

Repeat this for the Calendar, Common Data Extensions and Core Client projects.

The Google library has a dependency on System.Web for the class HttpUtility. Fortunately this is implemented in the mono source code proper. You can fetch it here: http://anonsvn.mono-project.com/viewvc/trunk/mcs/class/System.Web/System.Web/HttpUtility.cs (Thanks to Miguel for mentioning this on the monotouch list). Add a new C# library project named System.Web to the solution and add the HttpUtility.cs file to it. I commented out the AspNetHostingPermissionAttribute and the using System.Web.Util statement in the HttpUtility class as they weren’t needed in this project. Change the build target on the System.Web project to Mono for iPhone as before. One last thing to do is in the Core Client project tracing.cs file, comment out any calls to the Trace class, such as Trace.WriteLine, Trace.Flush and Trace.Assert (you could implement them as well if you wish, but it isn’t really necessary for demonstration). Build the solution to make sure everything is added correctly.

Now you are ready to use the library from monotouch. Let’s add a simple table view to display your list of google calendar events. Right-click on the gCal project->Edit References and add a project reference to all the other projects in the solution:

Next double-click on the MainWindow.xib to open interface builder. Add a UITableViewController to the xib file and name the class CalTVC. Add an outlet to the UIApplicationDelegate named calTVC and connect the outlet to the CalTVC UITableViewController that you previously added. Save and close interface builder.

Now we need to add the code for the UITableViewController. Add a new class to gCal project named CalTVC.cs. Add the following code to the class (see the monocatalog example for the sample code this is based upon):

using System;
using System.Collections.Generic;
using System.Linq;
using MonoTouch.Foundation;
using MonoTouch.UIKit;

namespace gCal
{
 public partial class CalTVC : UITableViewController
 {
 static NSString kCellIdentifier = new NSString ("CellIdentifier");

 public CalendarFacade Calendar { get; set; }

 public CalTVC (IntPtr p) : base(p)
 {
 }

 class DataSource : UITableViewDataSource
 {
 CalTVC _calController;

 public DataSource (CalTVC calController)
 {
 _calController = calController;
 }

 public override int RowsInSection (UITableView tableView, int section)
 {
 return _calController.Calendar.Events.Count;
 }

 public override UITableViewCell GetCell (UITableView tableView, NSIndexPath indexPath)
 {
 var cell = tableView.DequeueReusableCell (kCellIdentifier);

 if (cell == null)
 {
 cell = new UITableViewCell (UITableViewCellStyle.Default, kCellIdentifier);
 }

 cell.TextLabel.Text = _calController.Calendar.Events[indexPath.Row];

 return cell;
 }
 }

 public override void ViewDidLoad ()
 {
 base.ViewDidLoad();
 string googleUsername = "enter your google username here";
 string googlePassword = "enter your google password here";

 Calendar = new CalendarFacade (googleUsername, googlePassword);

 TableView.DataSource = new DataSource (this);
 }

 }
}

Notice the use of a class called CalendarFacade. This is the class that makes use of the Google library. The Authentication call to Google Data Service happens on https and mono doesn’t have any trusted root by default. For this demo, we’ll just bypass this to make things work by implementing ICertificatePolicy and returning true from CheckValidationResult, but you should consider this more carefully in an app you are going to release. See http://www.mono-project.com/UsingTrustedRootsRespectfully and http://www.mono-project.com/FAQ:_Security for more details.

using System;
using Google.GData.Calendar;
using Google.GData.AccessControl;
using Google.GData.Client;
using Google.GData.Extensions;
using System.Linq;
using System.Collections.Generic;
using System.Security.Cryptography.X509Certificates;
using System.Net;

namespace gCal
{
 public class CalendarFacade
 {
 CalendarService _csvc;
 string _username;
 string _pwd;
 List _eventTitles;

 public CalendarFacade (string username, string pwd)
 {
 _username = username;
 _pwd = pwd;

 ServicePointManager.CertificatePolicy = new Trustee ();

 _csvc = new CalendarService ("mycompany-myapp-1");
 _csvc.setUserCredentials (_username, _pwd);
 }

 class Trustee : ICertificatePolicy
 {
 public bool CheckValidationResult (ServicePoint sp, X509Certificate certificate, WebRequest request, int error)
 {
 return true;
 }
 }

 public List Events
 {
 get
 {
 if (_eventTitles == null)
 {
 string calUri = "http://www.google.com/calendar/feeds/default/private/full";

 EventQuery calQuery = new EventQuery (calUri);

 EventFeed calEvents = (EventFeed)_csvc.Query (calQuery);

 _eventTitles = calEvents.Entries.Select (calEventEntry => calEventEntry.Title.Text).ToList ();
 }

 return _eventTitles;
 }
 }
 }
}

The CalendarFacade creates a CalendarService instance using the passed in credentials. After this happens, we’re free to call into the library as needed. This example simply returns all the calendar entries and returns the event title for each entry to be loaded in the table view we previously created.

Here’s an screenshot of the app running:

How to create a simple iphone browser app using monotouch and c#

Cocoatouch includes a very powerful control called the UIWebView. This post will show you how to create a minimal browser app using this control via Monotouch. In future posts I will demonstrate the vast capabilities of this control.

The simple app we’ll be building will look like this:

First, open MonoDevelop and create a new iPhone Application

Next, open Interface Builder by double-clicking on the MainWindow.xib file in MonoDevelop. Add a UIWebView, a UITextField and 3 UIButtons so that your ui looks something like this:

After creating the ui, you need to create outlets so that you can interact with the various controls from code. Depending upon whether you are using Leopard or Snow Leopard, this will be a bit different. On Leopard, you can add outlets to the AppDelegate in the inspector window. (Snow Leopard changes interface builder somewhat. The monotouch documentation shows this here. We also set some properties on the UITextView so that is will show a keyboard appropriate for url entry and browser navigation.

Save everything in Interface Builder and go back to MonoDevelop. As this is a simple demo, I’m adding all the code in the Main.cs file just to keep it, well, simple.

In monotouch we have the choice to use C# style event handling or cocoatouch style messaging (you can read more about it here). Let’s choose c# events for this example (I’ll do something with the cocoatouch style in another post).

In FinishedLaunching everything is wired up. We respond to TouchUpInside for the various buttons and call the appropriate navigation methods on UIWebView.

The keyboard on the UITextView that is used for specifying the url is closed by calling ResignFirstResponser. When the Go buton on the keyboard is pressed, the keyboard will close and the UIWebView will request the specified url via the LoadRequest method.

Here’s the complete code:


using System;
using System.Collections.Generic;
using System.Linq;
using MonoTouch.Foundation;
using MonoTouch.UIKit;

namespace SimpleBrowser
{
public class Application
{
static void Main (string[] args)
{
UIApplication.Main (args);
}
}

// The name AppDelegate is referenced in the MainWindow.xib file.
public partial class AppDelegate : UIApplicationDelegate
{

// This method is invoked when the application has loaded its UI and its ready to run
public override bool FinishedLaunching (UIApplication app, NSDictionary options)
{

InitButtons();

InitWebView ();

InitUrlTextField();

MakeFirstRequest ();

window.MakeKeyAndVisible ();

return true;
}

void MakeFirstRequest ()
{
string url = "https://mikebluestein.wordpress.com";
urlText.Text = url;
NSUrlRequest req = new NSUrlRequest (new NSUrl (url));
webView.LoadRequest (req);
}

void InitUrlTextField ()
{
urlText.ShouldReturn = (textField) =>
{
textField.ResignFirstResponder ();
string url = textField.Text;
if (!url.StartsWith ("http"))
url = String.Format ("http://{0}", url);
NSUrl nsurl = new NSUrl (url);
NSUrlRequest req = new NSUrlRequest (nsurl);
webView.LoadRequest (req);
return true;
};
}

void InitWebView ()
{
webView.LoadFinished += delegate { urlText.Text = webView.Request.Url.AbsoluteString; };
}

void InitButtons ()
{
backButton.TouchUpInside += delegate { webView.GoBack (); };
fwdButton.TouchUpInside += delegate { webView.GoForward (); };
refreshButton.TouchUpInside += delegate { webView.Reload (); };
}

// This method is required in iPhoneOS 3.0
public override void OnActivated (UIApplication application)
{
}
}
}