I recently ran into an interesting issue with the code for the FindTheMonkey iBeacon app. Previously I had the code for the app to act as an iBeacon using a CBPeripheralManager, which I created in the ViewDidLoad method. This previously worked fine but someone ran into an issue where ranging for the beacon never discovered it. To resolve this involved a couple small changes:
Move the creation of the CBPeriheralManager into the constructor.
peripheralDelegate = new BTPeripheralDelegate ();

peripheralMgr = new CBPeripheralManager (
  peripheralDelegate,
  DispatchQueue.DefaultGlobalQueue);
Call the StartAdvertising method in ViewDidAppear.
public override void ViewDidAppear (bool animated)
{
  base.ViewDidAppear (animated);

  var power = new NSNumber (-59);
  peripheralData = beaconRegion.GetPeripheralData (power);
  peripheralMgr.StartAdvertising (peripheralData);
}
With these changes in place, ranging for the beacon discovers it as it had before:
I just got a new FireTV stick, which I purchased for the $19 Amazon Prime offer. Amazon has done some fantastic work in creating this device. Even at the $39 price it is a great buy imho 🙂
The first thing I wanted to try out was getting CocosSharp running on it. It turns out this was very easy thanks to the work that has gone into MonoGame plus CocosSharp, along with the Amazon Fire TV SDK Xamarin component that we released when the Fire TV came out.
The first thing I did to get up and running was deploy a hello world Xamarin.Android app. This was trivial following the instructions on the Xamarin component page. The button click event automatically mapped to the remote so all looked good. Amazon mapped the remote to key events, so you can do normal Android key processing in an activity to get input from the remote control. This makes it super easy.
More info on the working with the remote is available in the Amazon docs.
Moving over to CocosSharp, I decided to attempt running a simple game I had made earlier in the week for a Xamarin University lecture. Without any changes, the game deployed and ran just fine! However, it was written to handle touch, so I needed to add code to handle input from the remote.
First I tried adding a CCEventListenerKeyboard to handle it from shared code under CocosSharp, but as it turns out this didn’t work. Next attempt, I tried adding key handling in the AndroidGameActivity, which I knew worked from the earlier HelloWorld app I had tried. Interestingly, in a plain Activity it worked OK, but when using AndroidGameActivity, it didn’t. It seems there’s some special input handling under MonoGame for the Fire TV. I’m not sure if that’s related or not to what I ran into here. I’ll blog about that in the future if I learn more.
Moving right along, the next thing I tried was going straight at MonoGame input via the Keyboard class. Eureka, this worked fine.
All I needed to do was call Keyboard.GetState, followed by IsKeyDown to determine which key is being pressed. For this game, I move the ship up and down vertically, so all I needed to inspect were the up and down keys:
var state = Keyboard.GetState ();

var up = state.IsKeyDown (Keys.Up);

var down = state.IsKeyDown (Keys.Down);
Then I simply used actions to move the ship up and down appropriately. I could have done it with manual positioning in the game loop, but I like how easy it is to use actions. Plus, this makes adding timing functions a snap since they are available as actions as well. In this case I used CCEaseSineInOut.
With this code to handle the remote control input in place I deployed the app via Xamarin Studio and voilà, I could control the ship via the remote.
The next thing I noticed however was the custom particle systems I add for explosion effects seemed to cause performance to degrade. It wasn’t too bad, but I could notice it.
It turns out I was not being efficient with how I handled these particle systems. I was recreating a new system for each explosion (as the code below does), which required parsing the plist each time, among other things:
var explosion = new CCParticleSystemQuad ("implode.plist");

explosion.Position = pt;

AddChild (explosion);
To resolve this, I pre-created the system once and reused it as shown below:
There’s more to the Fire TV stick. The sdk supports, among other things, game controllers, which I’m going to pick up over the holiday and try out next, if I don’t get tackled by some angry shoppers. Hmm, angry shoppers, maybe there’s a game concept in that 😉
Last week I showed how to use Particle Designer in conjunction with a CocosSharp game targeting iOS and Android. One question that came up was if this would work in Windows Phone as well. CocosSharp works great on Windows Phone (and many other platforms since it’s built on MonoGame). So for the Windows aficionados out there, you can do all your development in Visual Studio and target Windows desktop, Windows Store, Windows Phone, (and of course iOS and Android via Xamarin 🙂
But the I wasn’t certain about the custom particle systems so I gave it a try. It turns out it works fine. All you need to do is include the plist files in the Content folder and set the Build Action to Content:
Here’s what the game looks like running on Windows Phone (a Lumia 520 running WP 8.1 in this case):
CocosSharp comes with a variety of particle systems. For example, the GoneBananas sample uses the sun particle system (CCParticleSun) to create an animated sun, as well as the explosion particle system (CCParticleExplode) to create an explosion effect whenever the monkey collides with a banana.
Although they are customizable, sometimes the built-in particle systems aren’t exactly what you want. Game developers often use particle system design tools for creating custom particle systems. One such commercial tool is the excellent Particle Designer from 71Squared.
Using Particle Designer is a great way to create custom effects and I was pleased to discover it works well with CocosSharp. For example, instead of using CCParticleExplode let’s change GoneBananas to instead use particle systems designed in Particle Designer, to create concentric exploding rings, as shown below:
Particle Designer has an export feature that supports a variety of export formats. In this case I exported the particle systems as plist files and added them to the respective Content folders of the CocosSharp iOS and Android projects respectively.
Then, to include them in the code, create a CCParticleSystemQuad for each particle system:
var particles = new[] { "innerring.plist", "outerring.plist" };

foreach (string p in particles) {
    var ps = new CCParticleSystemQuad (p);
    ps.Position = pt;
    AddChild (ps);
}
Now when you run the game, the custom particle systems appear as shown below:
iOS 8 added a lot of new functionality and APIs. Along the way, several things have changed. Here are a few items I’ve come across:
Documents and Library
UPDATE: Xamarin.iOS now handles getting the folder path correctly when using Environment.SpecialFolder in iOS 8 as well.
Prior to iOS8 it was common for Xamarin.iOS applications to access folder paths using the .NET System.Environment class, which on iOS provided a familiar abstraction around native system folders. For example, you could get to the documents folder like this:
var docs = Environment.GetFolderPath (
  Environment.SpecialFolder.MyDocuments);
However, in iOS 8 the location of some folders, namely the Documents and Library folders, has changed such that they are no longer within the app’s bundle.
The proper way of determining the location of these folders is to use the NSFileManager. For example, get the location of the Documents folder as follows:
var docs = NSFileManager.DefaultManager.GetUrls (
  NSSearchPathDirectory.DocumentDirectory,
  NSSearchPathDomain.User) [0];
Location Manager
To use location in iOS you go through the CLLocationManager class. Before iOS 8 the first time an app attempted to start location services the user was presented with a dialog asking to turn location services on. You could set a purpose string directly on the location manager to tell the user why you need location in this dialog.
In iOS 8 you now have to call either RequestWhenInUseAuthorization or RequestAlwaysAuthorization on the location manager. Additionally you need to add either the concisely named NSLocationWhenInUseUsageDescription or NSLocationAlwaysUsageDescription to your Info.plist. Thanks to my buddy James for tracking these down.
AVSpeechSynthesizer
The AVSpeechSynthesizer was added in iOS 7, allowing apps to deliver text to speech functionality with just a few lines of code, like this:
var speechSynthesizer = new AVSpeechSynthesizer ();

var speechUtterance = new AVSpeechUtterance (text) {

  Rate = AVSpeechUtterance.MaximumSpeechRate/4,

  Voice = AVSpeechSynthesisVoice.FromLanguage ("en-US"),

  Volume = 1.0f

};


speechSynthesizer.SpeakUtterance (speechUtterance);
The above code worked on either the simulator or a device prior to iOS 8. However, when run on an iOS 8 simulator, you are now greeted with the following error message:
While this worked before iOS 8, it did not guarantee the view controller hierarchy would be set up properly. A better approach, even before iOS 8, would be to set the InputAccessoryView directly to an instance of UIView subclass, not one contained in another UIViewController. Practically speaking, people would take the view controller approach because it let them set things up via a xib. Therefore, to handle the view controller case, iOS 8 introduced the InputAccessoryViewController property on UIResponder. It’s still easier to just use a UIView subclass imho, but if you need to use a UIViewController, set it to InputAccessoryViewController.
Action Sheets
Apple states in their documentation that you should not add a view to a UIActionSheet’s view hierarchy. Before iOS 8 adding subviews to a UIActionSheet would actually work, although it was never the intention (nor should it be subclassed). Code that took this approach should have presented a view controller.
In iOS 8 subclassing UIActionSheet or adding subviews to it will no longer work. Additionally UIActionSheet itself has been deprecated. Instead, you should use a UIAlertController in iOS 8 (UIAlertController should also be used in iOS 8 in place of the deprecated UIAlertView) as I discussed in my iOS 8 webinar.
Later this month we’ll have more Flashcasts, including one that shows how to use Xamarin’s iOS Designer for Visual Studio, and another on Xamarin.Forms. Keep an eye out for these, as well as other great topics at http://flashcast.azurewebsites.net
This post walks through making a simple app to call a phone number.
Setting up the Twilio Server
The first thing you need to do is sign up for a Twilio account. They have a free trail version, which you can sig nup for at https://www.twilio.com/try-twilio, that will work fine for our purposes.
Before getting started there is a bit of setup you’ll need to perform in the Twilio portal.
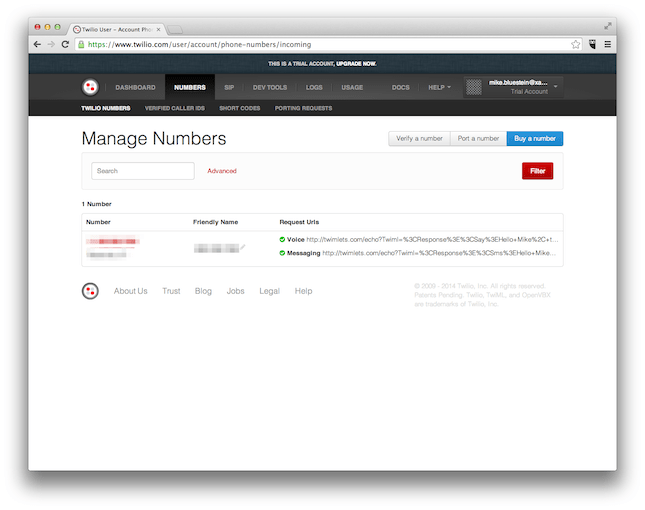
When you set up a Twilio account, you’ll be given a Twilio phone number. You can view your phone number at any time by selecting the “Numbers” section in the Twilio user account page:
You’ll also need your account SID and auth token, which you can get under the “dashboard” section of the account page.
The last thing you’ll need to create is a TwiML app, which you can do under “Dev Tools” > “TwiML Apps”. Set the app url to http://YourDomain/InitiateCall as shown below:
Note the SID here is the application SID,as opposed to the account SID shown earlier.
We these things in place, you’re ready to get started coding. Twilio requires a server to handle token generation and in this case, the TwiML app to initiate the call.
A free ASP.NET MVC website in Azure works fine. Here’s the full code for the ASP.NET MVC controller for this example:
using System;
using System.Collections.Generic;
using System.Linq;
using System.Web;
using System.Web.Mvc;
using Twilio;
using Twilio.TwiML;
using Twilio.TwiML.Mvc;

namespace TokenGenerator.Controllers
{
    public class ClientController : Controller
    {
        public ActionResult Token(string clientName = "default")
        {
            string accountSid = "Your account SID";
            string authToken = "Your auth token";
            string appSid = "Your app SID";

            var capability = new TwilioCapability(accountSid, authToken);
            capability.AllowClientIncoming(clientName);
            capability.AllowClientOutgoing(appSid);

            return Content(capability.GenerateToken());
        }

        public ActionResult InitiateCall(string source, string target)
        {
            var response = new TwilioResponse();
            response.Dial(target, new { callerId = source });

            return new TwiMLResult(response);
        }
    }
}
For the above code, you’ll also need to add a couple NuGet packages:
Twilio.Mvc
Twilio.Client
Then, simply replace the accountSid, authToken and appSid with the values obtained above and publish the site to Azure.
Using the Xamarin Twilio Component
For this example I’m just going to create a simple iOS client to make an outgoing call. However, Android is supported as well.
In a new iOS project create 3 buttons named callButton, hangUpButton and sendKeyButton (I used a storyboard to create the UI) and add the following code to the view controller.
using System;
using System.Net.Http;
using MonoTouch.Foundation;
using MonoTouch.UIKit;
using TwilioClient.iOS;

namespace HelloTwilio
{
    public partial class HelloTwilioViewController : UIViewController
    {
        TCDevice device;
        TCConnection connection;

        public HelloTwilioViewController (IntPtr handle) : base (handle)
        {
        }

        public async override void ViewDidLoad ()
        {
            base.ViewDidLoad ();

            var client = new HttpClient ();
            var token = await client.GetStringAsync ("http://YourSite/Client/Token");

            device = new TCDevice (token, null);

            callButton.TouchUpInside += (object sender, EventArgs e) => {

                string twilioNumber = "Your twilio number";
                string numberToCall= "Some number to call";

                var parameters = NSDictionary.FromObjectsAndKeys (
                    new object[] { twilioNumber, numberToCall },
                    new object[] { "Source", "Target" }
                );

                connection = device.Connect (parameters, null);
            };

            sendKeyButton.TouchUpInside += (object sender, EventArgs e) => {
                if (connection != null) {
                    connection.SendDigits ("1");
                }
            };

            hangUpButton.TouchUpInside += (object sender, EventArgs e) => {
                if (connection != null) {
                    connection.Disconnect ();
                }
            };
        }
    }
}
In the code, set the domain name you published to earlier where it says “YourSite” and add your Twilio number and a phone number to call respectively.
Adding the Twilio component is easy. Just right-click on “Components” in the Solution Explorer, select “Get More Components”, and pick the Twilio component.
Once the component is added, run the application and click “Call”. After hearing the trial account message, press the “Send Key 1” button and the phone call will be initiated.
There you have it, VoIP added to an iOS app. Pretty cool 🙂
There are many great resources for learning Xamarin, ranging from docs, samples and videos, to full-blown training via Xamarin University. If you’re just getting started, here are a list of resources to get you off to a good start. There are many other articles and samples as well in the Xamarin Developer Center, so it really depends upon your interests, but these are good fundamental topics in any case: