Xamarin
Reader Q&A – PDFs in iOS
I got a question from a reader last night who was looking at some code from one of my Xamarin seminars.
Ryan asked about how to extract the content from a pdf file, draw on it, and email it in iOS.
One way to do this is using Core Graphics, as shown in the following snippet:
var pdf = CGPDFDocument.FromFile (Path.Combine (NSBundle.MainBundle.BundlePath, "input.pdf"));
var data = new NSMutableData ();
var rect = new CGRect (0, 0, 400, 400);

UIGraphics.BeginPDFContext (data, rect, null);
UIGraphics.BeginPDFPage ();

var g = UIGraphics.GetCurrentContext ();
g.ScaleCTM (1, -1);
g.TranslateCTM (0, -400);

var p = pdf.GetPage (1);

var txf = p.GetDrawingTransform (CGPDFBox.Crop, rect, 0, true);
g.ConcatCTM (txf);
g.DrawPDFPage (p);

g.SetLineWidth (2);
UIColor.Red.SetFill ();
UIColor.Blue.SetStroke ();

var path = new CGPath ();

path.AddLines (new [] {
	new CGPoint (100, 200),
	new CGPoint (160, 100),
	new CGPoint (220, 200)
});

path.CloseSubpath ();

g.AddPath (path);
g.DrawPath (CGPathDrawingMode.FillStroke);

UIGraphics.EndPDFContent ();

var mail = new MFMailComposeViewController ();
mail.AddAttachmentData (data, "text/x-pdf", "output.pdf");
If you have a question feel free to contact me through my blog. I get lots of questions like this, but I do my best to respond to them all.
Load a Collada File in Scene Kit
My friend @lobrien (whose blog you should read if you don’t already) was asking about loading Collada files in Scene Kit, so I whipped up a quick example:
SCNScene scene;
SCNView sceneView;
SCNCamera camera;
SCNNode cameraNode;

public override void ViewDidLoad ()
{
	scene = SCNScene.FromFile ("duck", "ColladaModels.scnassets", new SCNSceneLoadingOptions ());

	sceneView = new SCNView (UIScreen.MainScreen.Bounds);
	sceneView.AutoresizingMask = UIViewAutoresizing.All;
	sceneView.Scene = scene;

	camera = new SCNCamera { XFov = 40, YFov = 40 };
	cameraNode = new SCNNode { Camera = camera, Position = new SCNVector3 (0, 0, 40) };
	scene.RootNode.AddChildNode (cameraNode);

	View.AddSubview (sceneView);
}
In the Xamarin Studio solution pad, the folder containing the Collada file has a .scnassets suffix, and the model has a build action of SceneKitAsset:

Given this, the model is rendered as shown below:

There’s also a Collada build action as well. I’ve never used that option though. If someone wants to elaborate on what that does (perhaps supporting animations embedded in Collada files? just a guess) please add a comment here.
Updated Scratch Ticket Code
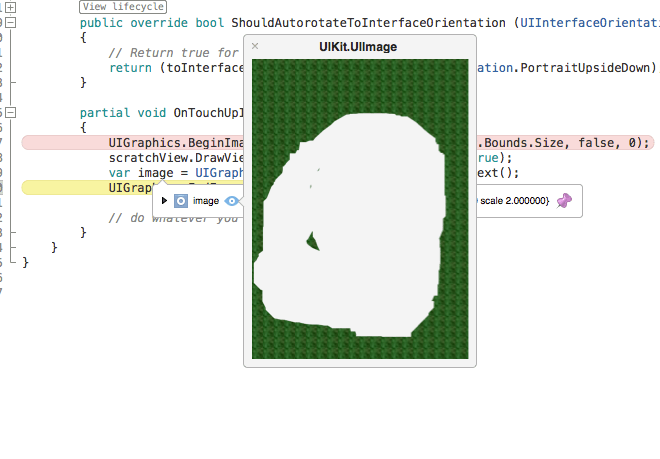
Someone asked a question in the Xamarin forums last week about the scratch ticket code I wrote a while back, so I decided to update it to work with the unified API and show how to get an image from the view, which is what the person in the forums was asking for.
One thing I find super useful in Xamarin Studio is the ability to see the image at runtime in the debugger (similar to what you’d get in Xamarin Sketches), as shown below:
You can get the updated code from my repo:
Visual Studio Code with Xamarin on a Mac
Microsoft just announced a new cross-platform editor that has many of the features of Visual Studio called Visual Studio Code. I downloaded it on my Mac to try out with a Xamarin.iOS project and see if it works. I was pleased discover it works out of the box (as far as I can tell on a first look).
Visual Studio Code works against files and folders. When you open a folder where a Xamarin.iOS project lives, all the files load fine and features such as links to references and even intellisense on iOS classes work great.
Here’s a class that implements a UIView subclass for example showing intellisense on CALayer:

You can download Visual Studio Code at: https://code.visualstudio.com/Download
NGraphics in a Xamarin Sketch
Frank Krueger published a new open source graphics library called NGraphics today. As with everything Frank does it looks pretty awesome. It even has its own editor where you can type in code and live preview the output. So you probably won’t need what I’m about to show you, but I was curious if it would work with Xamarin Sketches (just for kicks).
Sure enough, all I had to do was add LoadAssembly calls to reference NGraphics assemblies in the sketch and add the assemblies to the sketchname.sketchcs.Resources folder alongside the sketchcs file. Then, since Frank includes methods to return native image types, such as NSImage on Mac, I can leverage the sketch visualizers in Xamarin Studio to get a live preview.
Here’s Frank’s sample code to draw a house in a sketch:

Sketches in Xamarin Studio Alpha
A new version of Sketches just landed in the latest Xamarin Studio alpha. Let’s take a look at a couple new things that have been added.
In the previous version, images could be loaded in a sketch given the path on disk. Now, you can add a .Resources folder next to the sketch file, with the naming convention of sketchname.sketchcs.Resources.
For example, with a sketch named Sample.sketchcs, I created a folder named Sample.sketchcs.Resources at the same location as the sketch file, and added a file named hockey.png in the folder. WIth this I can write code like the following in the sketch:
using AppKit;

var image = NSImage.ImageNamed ("hockey");
Then I can visualize the image in the sketch:

Speaking of visualizers, they have been greatly enhanced in the latest version. For example, one of the many visualizers that has been added is for a CIImage. Therefore you can quickly iterate and test the results of different Core Image filters without needing to deploy an app!
For example, here’s some code to apply a noir effect to the above photo:
var noir = new CIPhotoEffectNoir {
    Image = new CIImage(image.CGImage)
};

var output = noir.OutputImage;
This result is immediately available to view as shown below:

There are 41 filters in total now, including NSAttributedString, NSBezierPath and CGPath to name a few.
See the Xamarin Studio release notes for the complete list, as well as all the other features that have been added.
CBPeripheralManager for iBeacons in iOS 8
I recently ran into an interesting issue with the code for the FindTheMonkey iBeacon app. Previously I had the code for the app to act as an iBeacon using a CBPeripheralManager, which I created in the ViewDidLoad method. This previously worked fine but someone ran into an issue where ranging for the beacon never discovered it. To resolve this involved a couple small changes:
- Move the creation of the CBPeriheralManager into the constructor.
- Call the StartAdvertising method in ViewDidAppear.
peripheralDelegate = new BTPeripheralDelegate ();

peripheralMgr = new CBPeripheralManager (
  peripheralDelegate,
  DispatchQueue.DefaultGlobalQueue);
public override void ViewDidAppear (bool animated)
{
  base.ViewDidAppear (animated);

  var power = new NSNumber (-59);
  peripheralData = beaconRegion.GetPeripheralData (power);
  peripheralMgr.StartAdvertising (peripheralData);
}
With these changes in place, ranging for the beacon discovers it as it had before:

Make a CocosSharp Game for the Amazon Fire TV Stick
I just got a new FireTV stick, which I purchased for the $19 Amazon Prime offer. Amazon has done some fantastic work in creating this device. Even at the $39 price it is a great buy imho 🙂

The first thing I wanted to try out was getting CocosSharp running on it. It turns out this was very easy thanks to the work that has gone into MonoGame plus CocosSharp, along with the Amazon Fire TV SDK Xamarin component that we released when the Fire TV came out.
The first thing I did to get up and running was deploy a hello world Xamarin.Android app. This was trivial following the instructions on the Xamarin component page. The button click event automatically mapped to the remote so all looked good. Amazon mapped the remote to key events, so you can do normal Android key processing in an activity to get input from the remote control. This makes it super easy.
More info on the working with the remote is available in the Amazon docs.
Moving over to CocosSharp, I decided to attempt running a simple game I had made earlier in the week for a Xamarin University lecture. Without any changes, the game deployed and ran just fine! However, it was written to handle touch, so I needed to add code to handle input from the remote.
First I tried adding a CCEventListenerKeyboard to handle it from shared code under CocosSharp, but as it turns out this didn’t work. Next attempt, I tried adding key handling in the AndroidGameActivity, which I knew worked from the earlier HelloWorld app I had tried. Interestingly, in a plain Activity it worked OK, but when using AndroidGameActivity, it didn’t. It seems there’s some special input handling under MonoGame for the Fire TV. I’m not sure if that’s related or not to what I ran into here. I’ll blog about that in the future if I learn more.
Moving right along, the next thing I tried was going straight at MonoGame input via the Keyboard class. Eureka, this worked fine.
All I needed to do was call Keyboard.GetState, followed by IsKeyDown to determine which key is being pressed. For this game, I move the ship up and down vertically, so all I needed to inspect were the up and down keys:
var state = Keyboard.GetState ();

var up = state.IsKeyDown (Keys.Up);

var down = state.IsKeyDown (Keys.Down);
Then I simply used actions to move the ship up and down appropriately. I could have done it with manual positioning in the game loop, but I like how easy it is to use actions. Plus, this makes adding timing functions a snap since they are available as actions as well. In this case I used CCEaseSineInOut.
Aside, if you want to learn more about timing functions and animation check out Jérémie Laval’s talk from Evolve 2014.
With this code to handle the remote control input in place I deployed the app via Xamarin Studio and voilà, I could control the ship via the remote.
The next thing I noticed however was the custom particle systems I add for explosion effects seemed to cause performance to degrade. It wasn’t too bad, but I could notice it.
It turns out I was not being efficient with how I handled these particle systems. I was recreating a new system for each explosion (as the code below does), which required parsing the plist each time, among other things:
var explosion = new CCParticleSystemQuad ("implode.plist");

explosion.Position = pt;

AddChild (explosion);
To resolve this, I pre-created the system once and reused it as shown below:
void InitExplosionParticles ()

{

  explosion = new CCParticleSystemQuad ("implode.plist");

  explosion.AutoRemoveOnFinish = false;

  explosion.StopSystem ();

  explosion.Visible = false;

  AddChild (explosion);
}
Then every time I created an explosion effect I set it as visible, moved it to the new location, and reset the system:
explosion.Visible = true;
explosion.Position = pt;
explosion.ResetSystem ();
With that change in place, the game ran smoothly.
Here’s a video of the game running on my Fire TV stick:
The code for the game is available in my GitHub repo.
There’s more to the Fire TV stick. The sdk supports, among other things, game controllers, which I’m going to pick up over the holiday and try out next, if I don’t get tackled by some angry shoppers. Hmm, angry shoppers, maybe there’s a game concept in that 😉
