Earlier this week Nokia announced their new line of Nokia X Android phones. C# developers using Xamarin can target this platform via the Nokia components in the Xamarin Component Store.
Let’s take a look at using the Nokia HERE Maps API in a Xamarin.Android applcation.
Nokia HERE Maps have a wealth of features ranging from 3D landmarks, to street-level imagery and venue maps.

See the HERE Maps section of the Nokia developer site for more information on the entire feature set.
The first thing you need to do is set up the Nokia X Platform, which can be done via the Android SDK Manager. The following doc on the Nokia developer site explains how to do this:
http://developer.nokia.com/resources/library/nokia-x/getting-started/environment-setup.html
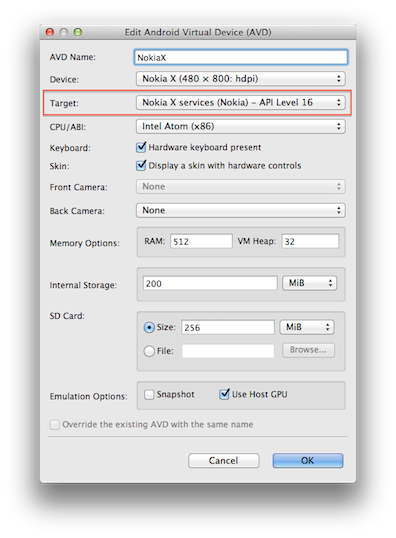
Note, when you create a Nokia X emulator, be sure to set the target to Nokia X services (Nokia) – API Level 16 as shown below:
Once you have your environment set up, create a new Android project that targets API level 16. To use Nokia HERE Maps from Xamarin, simply add the Xamarin component:
http://components.xamarin.com/view/NokiaHERE
The component brings everything you need directly into the project in either Visual Studio or Xamarin Studio. The sample projects included with the component show you how to get started.
Adding a Map
Basically, to include a map:
- Add your AppID and AppToken
- Set the required permissions
- Add a MapFragment
- Initialize the MapFragment
- Setup the map after the fragment has been initialized
AppID and AppToken
The AppID and AppToken can be set using attributes:
[assembly: MetaData("com.here.android.maps.appid", Value = "YourAppID")]
[assembly: MetaData("com.here.android.maps.apptoken", Value = "YourAppToken")]
Also, enable hardware-accelerated rendering:
[assembly: Application(HardwareAccelerated = true)]
Required Permissions
Next, the following required permissions need to be set in the Android manifest:
- AccessFineLocation
- AccessNetworkState
- AccessWifiState
- ChangeNetworkState
- Internet
- WriteExternalStorage
MapFragment
The Sample.HERE application included with the component adds the MapFragment in code via the FragmentManager:
fragment = new MapFragment ();
FragmentManager.BeginTransaction ()
  .Replace (Resource.Id.fragmentcontainer, fragment).Commit();
Additionally, you can add the MapFragment in the axml file, which is what I’ve done in this example:
Then in the Activity’s OnCreate method, retrieve the MapFragment and initialize it as follows:
mapFragment = FragmentManager.FindFragmentById (Resource.Id.mapfragment);
mapFragment.Init (this, this);
Accessing the Map Object
To get a reference to the map itself after the fragment initialization has completed, implement the IFragmentInitListener from the Nokia.Here.Mapping namespace, where you can access the map via the MapFragment’s Map property. Then you can call methods on the map such as SetCenter and SetZoomLevel:
public void OnFragmentInitializationCompleted (InitError error)
{
  if (error == InitError.None) {
    map = mapFragment.Map;

    double lat = 30.2652233534254;
    double lon = -97.73815460962083;

    map.SetCenter (MapFactory.CreateGeoCoordinate (lat, lon, 0.0), MapAnimation.None);
    map.SetZoomLevel (18.0, MapAnimation.None);
  }
}
This displays a map in the application as shown below:

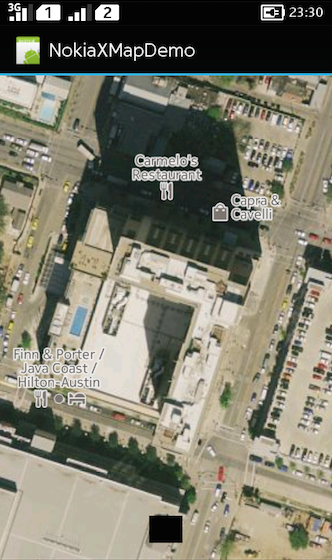
There are variety of map schemes that can be easily set via the MapScheme property. For example, setting map.MapScheme = MapScheme.SatelliteDay will show a map with daytime satellite imagery:

See Nokia Map Schemes documentation for the other schemes that are available.
As you can see, it’s pretty easy to get started. There are wealth of additional feature as well. For example, you can add a polygon to a map using the MapFactory class to create an IMapPolygon:
var geoPolygon = MapFactory.CreateGeoPolygon (new JavaList {
  MapFactory.CreateGeoCoordinate (30.2648461170005, -97.7381627734755),
  MapFactory.CreateGeoCoordinate (30.2648355402574, -97.7381750192576),
  MapFactory.CreateGeoCoordinate (30.2647791309417, -97.7379872505988),
  MapFactory.CreateGeoCoordinate (30.2654525150319, -97.7377341711021),
  MapFactory.CreateGeoCoordinate (30.2654807195004, -97.7377994819399),
  MapFactory.CreateGeoCoordinate (30.2655089239607, -97.7377994819399),
  MapFactory.CreateGeoCoordinate (30.2656428950368, -97.738346460207),
  MapFactory.CreateGeoCoordinate (30.2650364981811, -97.7385709662122),
  MapFactory.CreateGeoCoordinate (30.2650470749025, -97.7386199493406)
});
MapPolygon’s are one of many MapObjects. These are added to the map by calling AddMapObject:
map.AddMapObject (mapPolyline);
With this, we get an overlay of the specified coordinates:

You can download the sample code shown here from my github repo.